25.09.01
Introduction
We are pleased to announce the release of Piyovi v25.09.01, which includes key enhancements aimed at improving usability, operational efficiency, and shipment visibility. Below is a summary of the new features and updates included in this release.
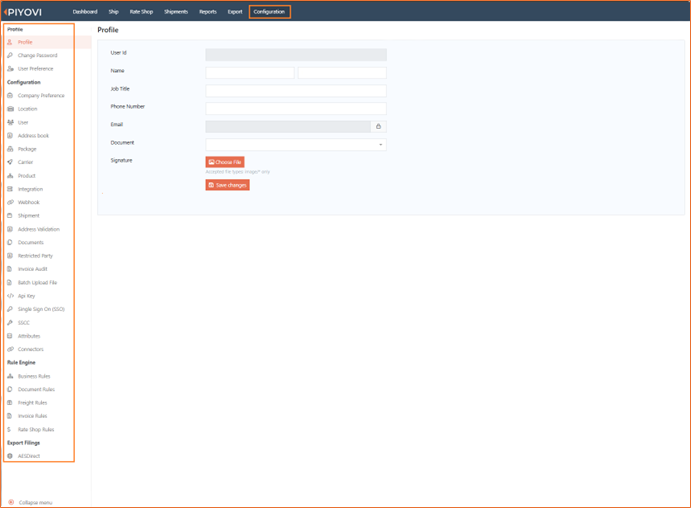
1. New Configuration Page Layout – Grouped & Organized Navigation
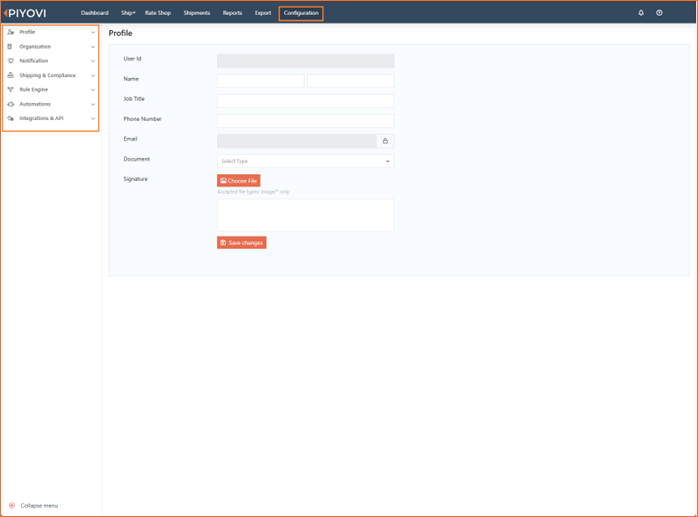
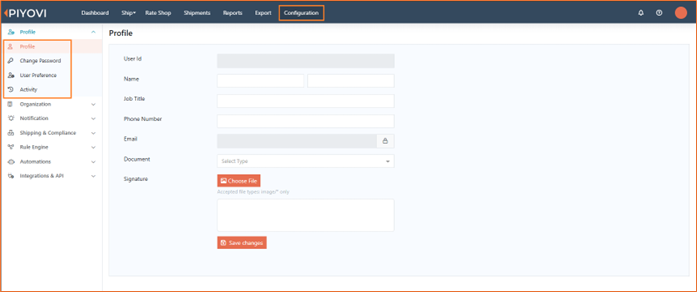
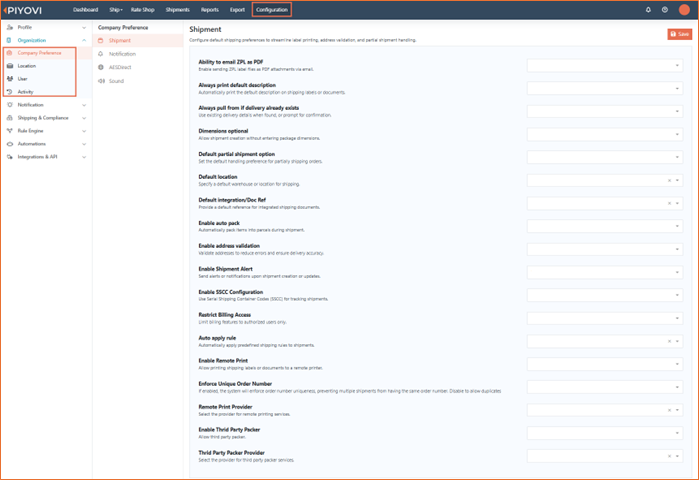
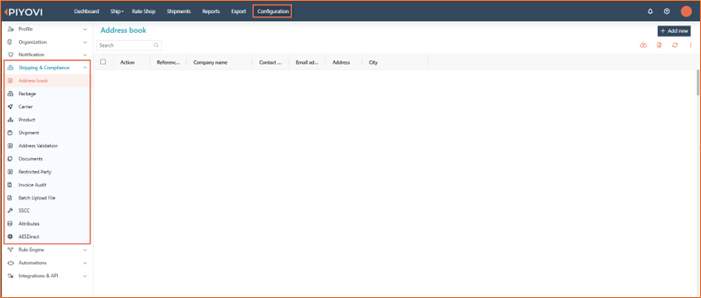
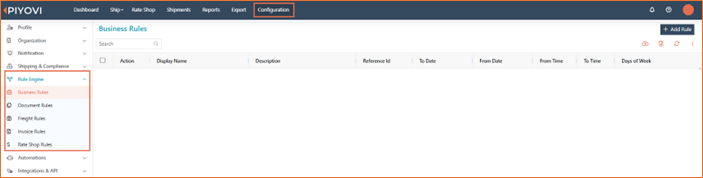
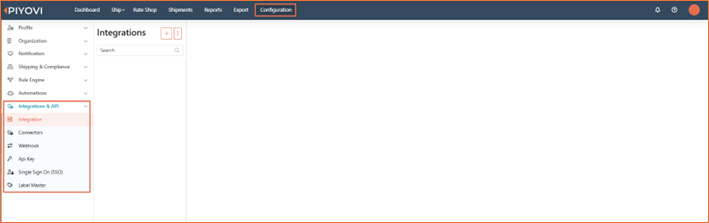
We have redesigned the Configuration page to improve usability, navigation, and feature discoverability. Previously, all configuration options were displayed in a flat list, which made it difficult for users to locate related settings. With this update, configuration items are now organized into logical groups such as Profile, Organization, Notification, Shipping & Compliance, Rule Engine, Automations, Integrations & API, etc. This new structure provides a cleaner look and makes navigation easier for end users.
Key Improvements
- Grouped Navigation: Similar configuration options are grouped together, reducing scrolling and search time.
- Expandable Menus: Each group expands/collapses for quick access without cluttering the screen.
- Improved Usability: Users can now quickly identify where a particular setting belongs.
- Consistent Layout: The UI aligns with modern application design standards, ensuring an intuitive experience.
How to Use
- Navigate to Configuration from the top menu.
- Select a group (e.g., Organization, Notification, Rule Engine).
- Expand the group to access related sub-options.
- Click on the desired option to configure settings.
Before vs. After:
- Before:
All configuration options were listed directly under Configuration in a single vertical menu.
- After:
Options are now categorized into expandable groups with sub-sections for easier navigation.
-
Profile
-
Organization
-
Notification
-
Shipping & Compliance
-
Rule Engine
-
Automations

-
Integrations & API
2. Carrier Restrictions Enforced System-wide
We have enhanced the Limit to Carrier functionality to ensure that carrier restrictions are applied consistently across the entire application.
Previously:
-
Although users could be limited to specific carriers through User configuration, this restriction was not enforced everywhere in the system.
-
For example, in Rate Shop and Ship View, users were still able to view all carriers, regardless of their assigned permissions.
-
This behavior caused inconsistencies between user permissions and what was displayed in the system.
Improvement
With this release, the Limit to Carrier feature has been extended and enforced across the application. Now, users will only be able to view or interact with carriers that are explicitly permitted for them.
-
Rate Shop: Only allowed carriers will be visible for rate shopping.
-
Ship View Tab: Users will see rates only for permitted carriers and restricted carriers will no longer appear.
-
Export & External Rate Shop: Carrier restrictions now apply when exporting shipments and when using external rate shop services.
-
Configuration & Rules: All carrier-based configurations and rule engines now respect the user’s carrier limitations.
3. Sounds of Shipment – Extended to Additional Actions
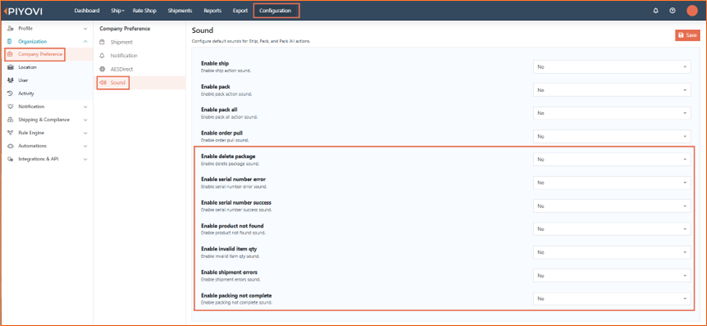
We have enhanced the Shipment Sounds configuration to support more shipment and packing actions. Previously, sound alerts were limited to Get Data, Pack, Pack All, and Ship. With this release, we have extended the functionality to cover additional shipment events including errors and exceptions. This improvement allows operators to receive immediate audio feedback during shipment processing, reducing the need to monitor screens constantly and ensuring faster identification of errors.
Configuration Path
Configuration → Organization → Company Preference → Sound
How to Use
-
Navigate to the Sound tab under Company Preference.
-
For each action, select Yes/No to enable or disable the sound alert.
-
Save changes to apply preferences.
Available Actions for Sound Alerts
- Existing Sounds (Updated):
-
Ship
-
Pack
-
Pack All
-
Order Pull
-
- Newly Added Sounds:
-
Shipment Errors
-
Packing Not Complete
-
Product Not Found
-
Serial Number Error
-
Serial Number Success
-
Delete Package
-
Invalid Item Quantity
-
4. Export Permissions – Independent for Shipments, Users, and Invoices
We have enhanced the Export functionality in Piyovi by introducing independent export permissions for Shipments, Users, and Invoices.
Previous Behavior
-
Export capability was tied to broader management permissions such as:
- Manage Shipment
- Manage User
- Manage Invoice Reports
-
This allowed users with management rights to also perform exports, even if export access was not intended.
-
Export Excel sheets and Master Export options were visible when these management permissions were assigned.
New Behavior
-
Export rights are now decoupled from management permissions.
-
Three new dedicated permissions have been introduced:
- Ability to Export Shipments
- Ability to Export Users
- Ability to Export Invoice Reports
-
With this update:
-
Users with only Manage Shipment, Manage User, or Manage Invoice Reports will no longer see the Export Excel sheet or Master Export options.
-
To access these export features, users must now have the respective export permission explicitly assigned.
-
How It Works
-
Navigate to Configuration > User > Permissions.
-
Assign the relevant export permissions to roles/users:
- Ability to Export Shipments for Shipment Exports
- Ability to Export Users for User Exports
- Ability to Export Invoice Reports for Invoice Report Exports
-
Users without these permissions will no longer see or access the export option in Shipments, Users, or Invoice Reports.
5. Show Shipment Error Messages in Shipment Report
We have enhanced the Shipment module to persist and display carrier error messages when a shipment attempt fails.
Previously, error messages were displayed only in real-time during shipment creation but were not stored in the system. This limited the ability of users to review errors later, causing challenges in traceability and troubleshooting.
With this release, error messages are now stored with the shipment record and can be reviewed at any time from the shipment screen.
Enhancement Details
-
Error Message Storage
-
All error messages received from carriers during shipment attempts are now captured and associated with the corresponding shipment record.
-
These messages are persisted in the system for future reference.
-
-
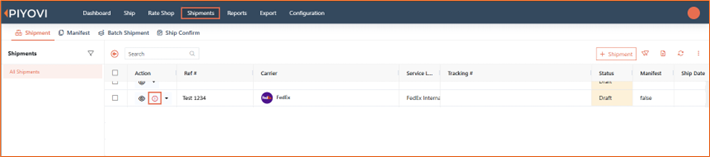
UI Enhancement – Shipment Screen
- An info icon has been added near to the Action column in the Shipment screen.
- If a shipment has a stored error message, the
 icon will be displayed.
 - Clicking the icon opens a pop-up showing the error message received.
-
Webhook Support
-
A new webhook event Shipment Error is triggered whenever a shipment error is received from a carrier.
-
This allows external systems to be notified in real time when shipment errors occur.
-
Note- Only carrier-side errors are captured and displayed. Internal application errors are not included in this feature.
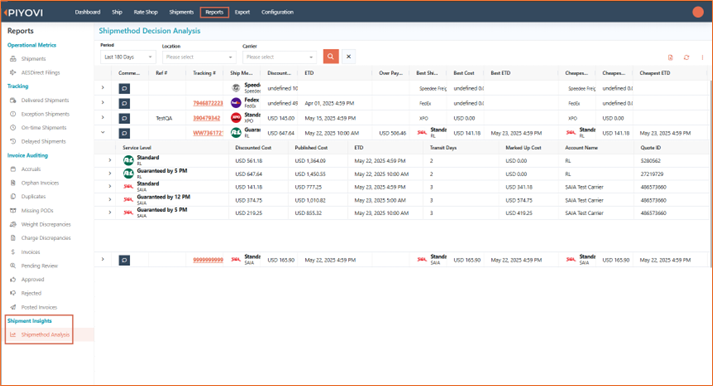
6. Rate Shop Carrier Comparison Report
We have introduced a new Rate Shop Carrier Comparison Report under Shipment Insights to provide visibility into carrier responses during rate shopping. This report enables users to compare quotes across carriers, evaluate pricing spreads, and review the final carrier selected for shipment.
Key Features
- Carrier Response Report Generation
- Displays all carriers that responded during a rate shop event.
- Includes Carrier Name, Account #, and Quoted Amount for each carrier response.
- Comparison Highlights
- Minimum quoted rate highlighted.
- Maximum quoted rate highlighted.
- Selected carrier name and selected rate shown.
- Difference between maximum and minimum quotes calculated automatically.
- Filtering & Export Options
- Filter by Period, Location, Carrier.
- Export report to Excel for offline analysis.
Configuration Path
Reports → Shipment Insights → Rate Shop Carrier Comparison Report
Permissions
Access to this report is controlled via a new permission: Manage Shipment Insights Report
How to Enable Permission
-
Go to Configuration → User → Permissions.
-
Locate the permission Manage Shipment Insights Report.
-
Check the box to enable this permission for the desired role or user.
-
Save the changes.
-
Once enabled, the user can access the Rate Shop Carrier Comparison Report under Shipment Insights.
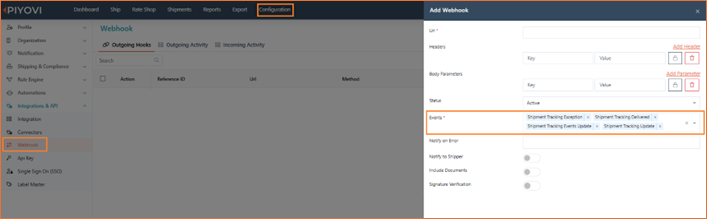
7. Webhook: Shipment Tracking Updates & Exceptions
We have enhanced the Webhook framework in Piyovi by adding support for Shipment Tracking Updates and Shipment Tracking Exceptions. These new webhook events give customers greater flexibility in integrating shipment milestone updates into their external systems.
Enhancement Details
- Shipment Tracking Update (Existing – Enhanced)
-
Sends the complete set of milestones for a shipment each time a milestone is updated.
-
Ensures the receiver always has the full milestone history for the shipment.
-
- Shipment Tracking Event Update (New)
-
Sends only the latest milestone whenever it is updated or added.
-
Useful when only incremental updates are required instead of the entire milestone history.
-
- Shipment Tracking Exception Event (New)
-
Triggers only when an exception milestone occurs (e.g., delivery failure, delay, hold).
-
Sends the exception details only, reducing unnecessary traffic and focusing on critical events.
-
Configuration Path
Configuration ��→ Integrations & API → Webhook → Add/Edit Webhook → Event Type
How to Use
-
Go to Configuration > Webhook.
-
Select Add Webhook or edit an existing webhook.
-
Choose one of the new event types under Shipment Tracking:
-
Shipment Tracking Update (all milestones)
-
Shipment Tracking Event Update (latest milestone only)
-
Shipment Tracking Exception Event (only exceptions)
-
-
Save the Webhook.
-
Once configured, the system will begin sending event payloads to the defined webhook endpoint.
8. Shipment Density Calculation
We have introduced a new feature to calculate and display shipment density based on package weight and dimensions.
To view shipment density, you can also add the Density column by navigating to Package Column Options and selecting Density.
How to Use
- Navigate to the Ship screen.
- Enter package weight and dimensions.
- The system automatically calculates and displays the density value.

- Accurate Density: Provides correct shipment density directly in the system.
- Better Rating: Supports accurate freight rating and chargeable weight calculations.
- Compliance: Helps validate shipments against carrier NMFC subclass requirements.
- Cost Savings: Reduces risk of carriers assigning higher-cost subclasses due to missing/incorrect density.
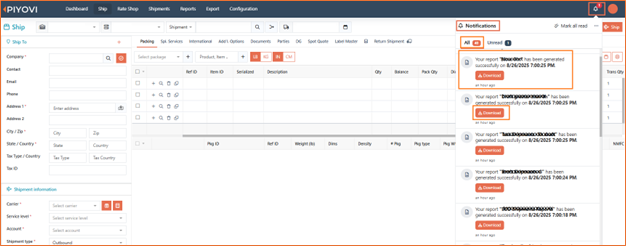
9. In-App Notification Panel
We have introduced a new In-App Notification Panel to help users view and manage their notifications directly within the application. With this enhancement, users no longer need to wait for emails or manually check report screens. The In-App Notification Panel provides a centralized, real-time view of scheduled report updates with easy download and management options.
Enhancement Details
-
Notification Listing
-
A notification bell icon has been added to the application header.
-
The bell shows a red dot and count badge when new/unread notifications are available.
-
Clicking the bell opens a dropdown panel with two tabs:
- All – Displays all report notifications.
- Unread – Displays only unread notifications.
-
Each notification shows:
- Report name (e.g., “Shipment”)
- Exact generated time (UTC format), shown in bold
- A Download button when a report file is available
-
-
Notification Content
-
Standardized message format: “Your report ‘[ReportName]’ has been generated successfully on [DateTime].”
-
Includes a Download button to access the report directly.
-

-
User Actions
Users can perform the following actions within the notification panel:-
Mark all as read
-
Clear all notifications from the action menu
-
Refresh the panel to load new messages
-
-
Unread Indicator
-
New/unread messages are marked with a blue dot.
-
Once clicked or marked as read, the notification moves to the All tab and the blue dot is removed.
-
-
Empty State
- If there are no unread messages, the Unread tab displays an empty state message to indicate there are no new notifications.
Notes- Currently, notifications are enabled only for scheduled reports.
10. Company Notification
We introduced a new Notification area under Configuration.
What’s new
-
Company Notification tab to view and manage notification records generated by the Piyovi(e.g., scheduled report updates) across In-App, Email, and Teams channels.
-
Header bell widget for quick, in-app access to new/unread notifications.
-
Role-based permissions to control who can view vs. manage notifications.
Navigation
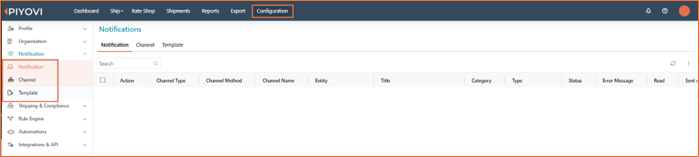
Configuration → Notifications
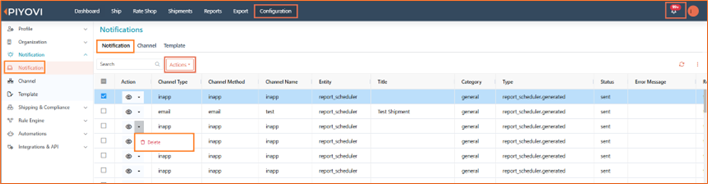
Notification List View
-
Tabbed navigation at the top of the page:
-
Notification (this log)
-
Channel (delivery endpoints)*
-
Template (message templates)*
*Covered in separate release notes. -
-
Columns
-
Entity (e.g., report_scheduler)
-
Channel Name (e.g., Send Grid, Teams)
-
Channel Method (e.g., sendgrid, email)
-
Channel Type (email, chat, inapp)
-
Status (sent, failed, pending, seen)
-
Created On, Updated On
-
Created By
-
-
Utilities
- Search, sorting, and pagination for quick access.
-
Row actions
-
View to open the details modal.
-
Overflow menu (if permitted): Resend, Delete.
-
Permissions
Assign under Configuration → User → Permissions:
-
Manage Notification – can View and delete
-
Notification – Readonly – view list and open details only (no delete).
Notes
• Channels and Templates are controlled by their own “Manage …” and “… – Readonly” permissions.
• If User B runs a scheduled report for User A, the notification is sent to User A.
• UTC time is shown in the panel for consistency.
• Scope (current): Scheduled reports; other entities can be added later.
How to use
-
View in-app: Click the bell → check Unread or All → Download, mark read, refresh, or clear.
-
View full log: Configuration → Notification → Notification → search/filter → open View to see details/content/parameters.
-
Manage Notification: Use row menu to Resend or Delete .
11. Notification- Channel
We introduced a Channel tab inside Configuration → Notification that lets authorized users configure where and how system notifications are delivered (e.g., Email, SendGrid, SMTP, Teams). Channels define method, provider, and delivery settings and are used by Company Notifications and scheduled report alerts.
Configuration Path
Configuration → Notification → Channel
Permissions
Assign under Configuration → User → Permissions:
-
Manage Notification Channel – add, edit, delete, and Test channels.
-
Notification Channel – Readonly – view list and details only.
(Company Notification and Template tabs have their own manage/readonly permissions.)

Channel List View
-
Columns: Action (View, Test, Edit, Delete), Reference ID, Name, Provider (sendgrid/teams/email), User, Status (Active/Inactive), Created On, Updated On, Created By.
-
Utilities: search, sort, refresh, pagination.
-
Row actions:
-
View – open read-only details.
-
Test – send a test message using the channel.
-
Edit – modify channel.
-
Delete – delete (with confirmation).
-
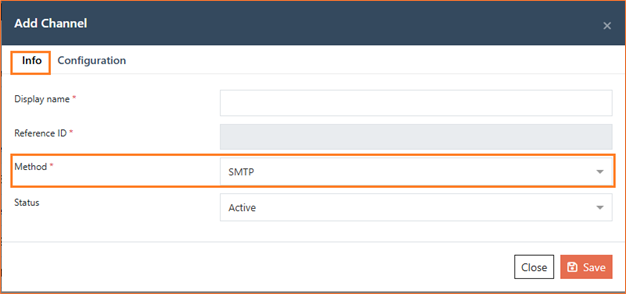
Add / Edit Channel (Common)
-
Click + in Channel tab.
-
Info:
-
Display name (required)
-
Reference ID (required, unique)
-
Method (Email / SendGrid / Chat – Teams)
-
Status (Active / Inactive)
-
-
Configuration: fields depend on the chosen method (see steps below).
-
Save. Use Test to verify.
Tip: Use a naming convention (e.g.,
sendgrid-prod,smtp-it,teams-ops) to keep channels clear.
Steps to Create Channels
A) Email (SMTP) Channel
-
Add Channel → Info
-
Display name: e.g., Email – SMTP
-
Reference ID: e.g., CID-SMTP-01
-
Method: Email
-
Status: Active
-
-
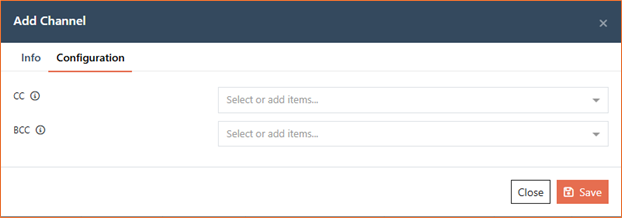
Configuration
-
CC / BCC (optional; allow multiple addresses)
-
SMTP Host (required)
-
SMTP Port (required – typical: 587)
-
SMTP Username (required)
-
SMTP Password (required)
-
From Email (required)
-
From Name (optional)
-
Enable SSL (Yes/No based on your server)
-
-
Save → Test to send a sample email and confirm success/failed result.

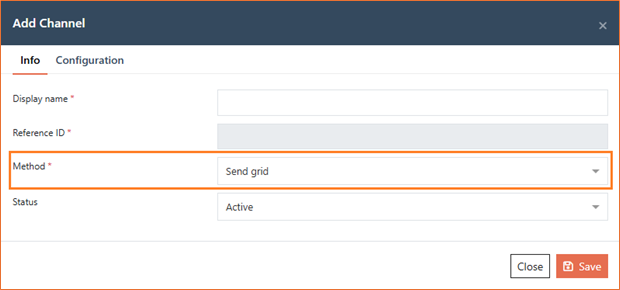
B) Email (SendGrid) Channel
-
Add Channel → Info
-
Display name: Email – SendGrid
-
Reference ID: e.g., CID-SENDGRID-01
-
Method: SendGrid
-
Status: Active
-
-
Configuration
-
CC / BCC (optional; multiple)
-
API credentials / token (based on your organization’s SendGrid setup in Connector)
-
From Email / From Name
-
-
Save → ** Test** to verify delivery through SendGrid.
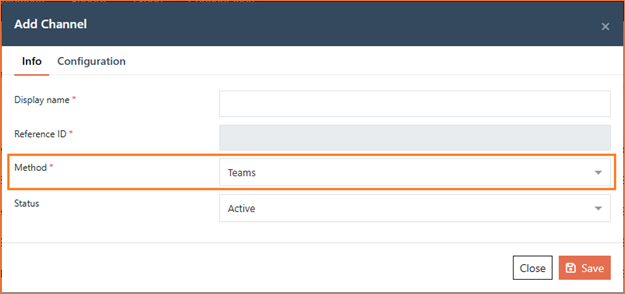
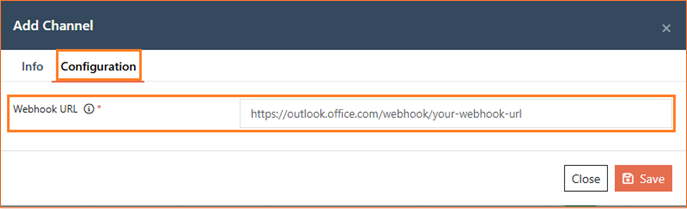
C) Chat (Microsoft Teams) Channel
-
Add Channel → Info
-
Display name: Teams – Notifications
-
Reference ID: e.g., CID-TEAMS-OPS
-
Method: Chat (Teams)
-
Status: Active
-
-
Configuration
-
Incoming Webhook URL (paste the Teams channel webhook created by your Teams admin)
-
(Optional) Default @mentions or channel notes if your org standardizes them
-
-
Save → Test to post a sample message to the Teams channel.
Delete Channel
-
From the row Action menu choose Delete, confirm in the dialog.
-
Deleting removes the channel from future deliveries; existing notification records remain in the log.
Benefits
-
Centralized control: One place to manage all outbound notification paths.
-
Reliability: Test channels before using them in production.
-
Security & governance: Fine-grained permissions separate view from manage.
-
Flexibility: Support for SMTP Email, SendGrid, and Teams chat out of the box.
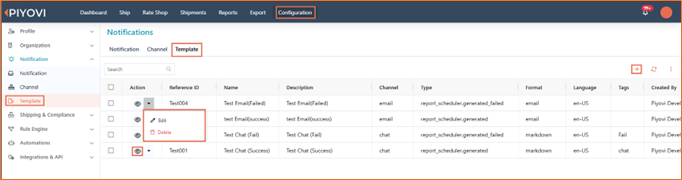
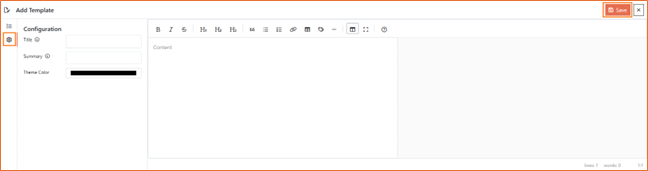
12. Notification - Template (Create & Manage Message Templates)
We added a new Template tab under Configuration → Notification that lets administrators create, preview, and manage notification message templates for events (e.g., scheduled report generated) across channels like Email and Chat (Teams). Templates ensure consistent content, support multiple formats (Markdown, drag-and-drop Email Builder), and can be reused across events and companies.
Configuration
Configuration → Notification → Template
Permissions
-
Manage Notification Template – create, edit, delete templates.
-
Notification Template – Readonly – view templates and details only.
Channels and Notifications have their own permissions and are managed separately.
What’s new
-
Template list with search & filters (Name, Event Type, Channel, Format, Status, Tags).
-
Add / Edit / Delete actions from the list.
-
Channel-aware formats
-
Email: drag-and-drop Email Builder.
-
Chat (Teams): Markdown editor (channel-safe).
-
-
Live Preview while editing.
-
Configuration fields per channel:
-
Email: Subject (Configuration tab).
-
Chat (Teams): Title, Summary, Theme Color (Configuration tab).
-
-
Placeholders supported, e.g.
{{ReportName}},{{DownloadLink}},{{GeneratedAt}}. -
Reference ID (unique) for routing & audit.
Template fields (General tab)
-
Display name (required)
-
Reference ID (required; unique)
-
Event Type (e.g.,
report_scheduler.generated) -
Channel (Email or Chat)
-
Format ( Markdown, or Email Builder)
-
Language (e.g., United States (EN))
-
Status (Active / Inactive)
-
Tags (optional)
How to create a template
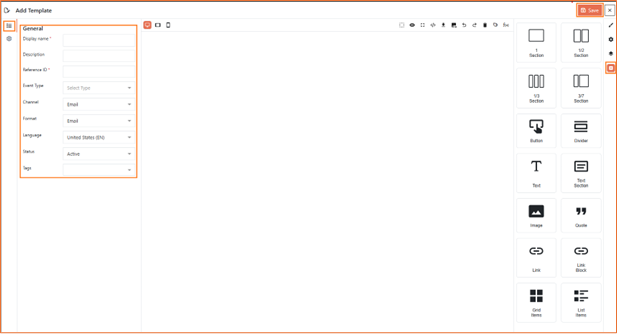
A) Email template
-
Go to Configuration → Notification → Template and click +.
-
General:
-
Set Display name, Reference ID, Event Type = Scheduled Report Generation (or required event).
-
Channel = Email.
-
Format = Email.
-
Choose Language, set Status = Active (add Tags if needed).
-
-
Content:
-
Email Builder: drag sections (1/2, 1/3, text, image, button, etc.) and compose your layout.
-
Use placeholders like
{{ReportName}}and{{DownloadLink}}. -
Verify the Preview pane updates live.
-
-
Configuration:
- Enter Subject for the email.
-
Save the template.

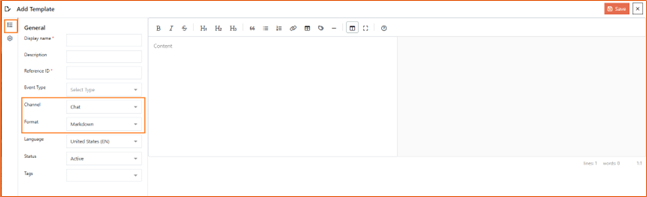
B) Chat (Teams) template
-
+ Add a new template.
-
General:
-
Channel = Chat.
-
Format = Markdown (recommended for Teams), Status = Active.
-
-
Content:
-
Write the message in Markdown.
-
Use placeholders, e.g.
**{{ReportName}}** has been generated. Download: {{DownloadLink}} Generated at: {{GeneratedAt}} (UTC) -
Check the Preview.
-
-
Configuration:
- Set Title, Summary, and Theme Color (used by the chat card/adaptive style where supported).
-
Save the template.
Using & maintaining templates
-
Edit / Delete from the Action menu in the Template list.
-
Status controls whether a template is available for routing.
-
Search to quickly find templates by event, channel, format, language, or tags.
-
Templates are linked by Event Type + Channel; the system picks the right template when that event fires.
Notes
-
For Chat/Teams, keep content concise; advanced HTML isn’t supported—use Markdown.
-
All notification timestamps are displayed in UTC in messages that include
{{GeneratedAt}}. -
Keep Reference ID stable; it’s used internally for mapping and audit.
Impacted area
-
Configuration → Notification → Template (new end-to-end template management)
-
Notification rendering for Scheduled Report Generation (and other mapped events) across Email and Chat.
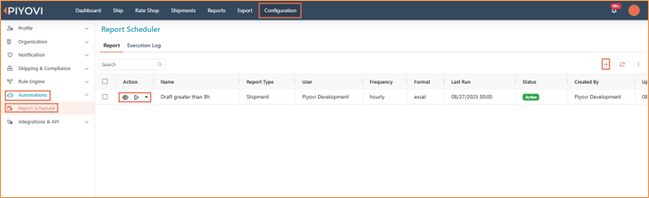
13. Automations - Report Scheduler (create & deliver shipment reports automatically)
The Report Scheduler lets you configure shipment reports once and have them run automatically on a schedule. Each run applies your filters, selected columns, and sorting, then delivers the file to your chosen channel (Email, Teams). You’ll also get an in-app notification (shown in UTC) with a Download action when a report is generated.
Configuration
Configuration → Automations → Report Scheduler → Add Report
How to use
Configure the schedule(Left Panel)
-
Name – Friendly name for the schedule (e.g., FedEx Draft Shipments).
-
Report Type – Report to generate (e.g., Shipment).
-
Frequency – How often to run (Hourly, Daily, Weekly, …).
-
Start On / End On – Active date window for the schedule.
-
Format – Output file type (Excel, PDF, …).
-
Status – Active or Inactive.
-
Timezone – Run time is evaluated in the selected timezone.
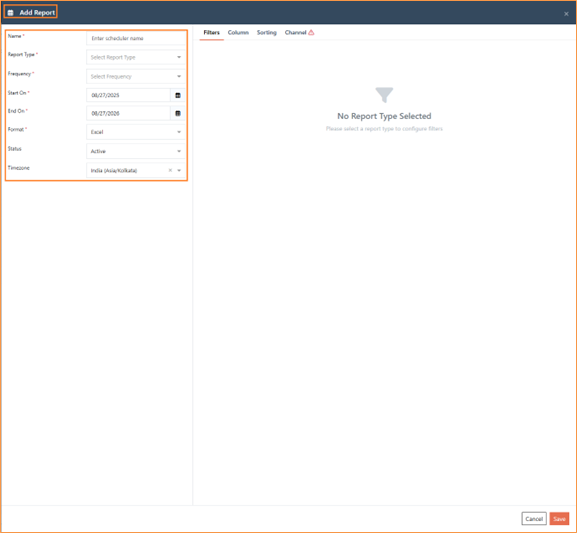
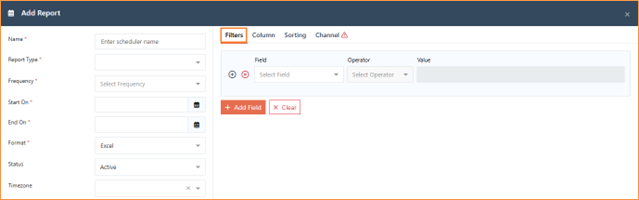
Tabs
1) Filters- Add rule(s) to decide what is included.
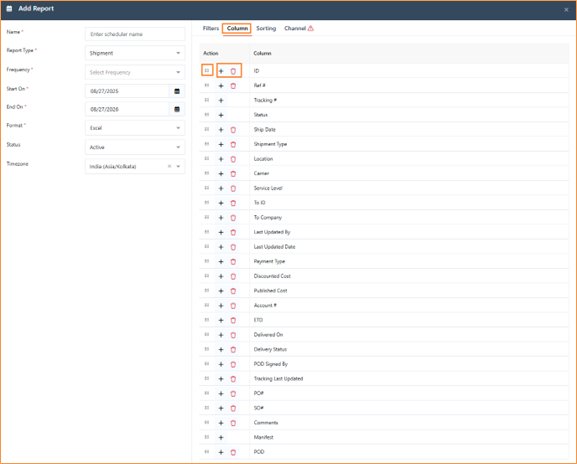
2) Column- Pick which fields appear in the report (e.g., Shipment ID, Carrier, Status, Created Date). You can add/remove and reorder columns.
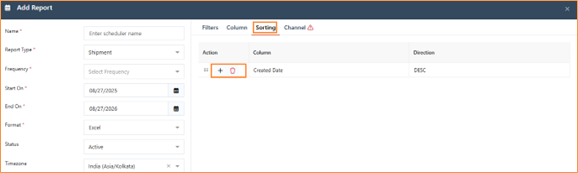
3) Sorting- Define how rows are ordered (e.g., Created Date – DESC).
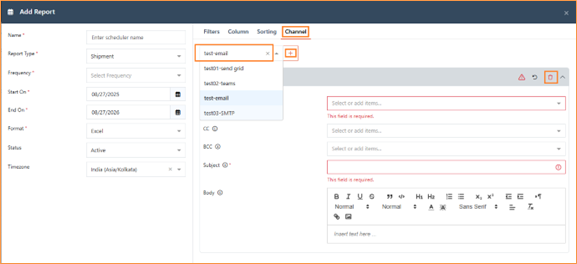
4) Channel- Choose where to deliver the report and configure message details. Select an existing channel (Email / Teams).
Delivery & notifications
At each schedule, Piyovi generates the report using your configuration and sends it to the selected channel.
An in-app notification confirms completion and provides a Download link (UTC time shown).
14. Rate Shopping API Enhancements for Rule Control
In this release, we’ve added more flexibility to the Rate Shopping API by introducing flags that give you better control over how rules are applied. Previously, Rate Shopping Rules were always applied by default. Now, you can explicitly decide whether to use them, or leverage your Business Rules within the Rate Shopping process.
How it works
- Apply Rule: true
- Applies Business Rules to rate shopping.
- If the business rule specifies cheapest and fastest options, those results will be returned.
- Apply RateShop Rule: true
- Applies Rate Shopping Rules directly.
- Returns results based on the configured rate shopping logic.
Benefits
- Greater flexibility and control over rate api.
- No need to maintain the same rule in multiple places.
15. User : Flexible Password & Notification Options
Admins can now create and manage users even when a real email isn’t available. During Create User, Reset Password, and Bulk Import, you can choose to auto-generate a password, send (or suppress) the email notification, and require a password change at first sign-in. Manually entered passwords must meet policy: 8–15 characters and at least 3 of these types — uppercase, lowercase, number, special.
What’s new
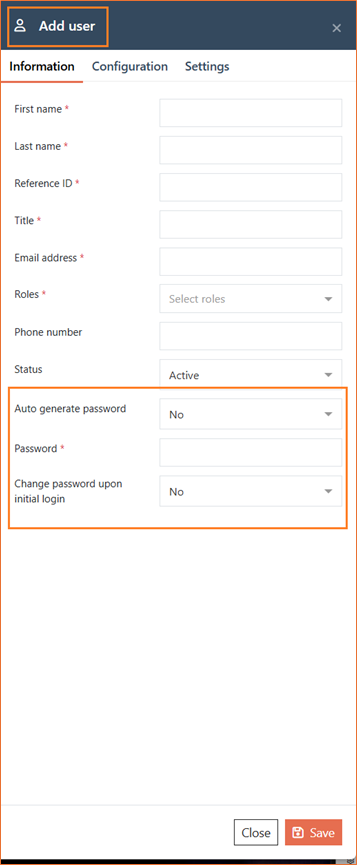
- Create User (UI)
-
Password (optional): enter your own or leave blank and let the system create one.
-
Notify user (email): Yes/No to control whether an email is sent.
-
Change password upon initial login: Yes/No to force a change on first sign-in.
-
- Reset Password (UI)
- New popup with the same controls: Auto generate password and Require change at first login.
- Bulk Import
- Import template supports three new columns:
-
Email Notification (
yes/no) -
Password (leave blank to auto-generate)
-
Change Password Upon Initial Login (
yes/no)
-
- Accepted file types: .xlsx, .csv.
- Import template supports three new columns:
How it works
-
If you choose Auto generate password, the system creates a strong password for the user. If Notify user is set to Yes, an email is sent with that password. If Change password upon initial login is Yes, the user must set a new password the first time they sign in.
-
If you don’t auto-generate, you must provide a password that meets the policy. The email is sent only when Notify user = Yes. Whether the user is forced to change the password on first sign-in depends solely on the Change password upon initial login setting.
-
For Bulk Import, the same rules apply: leave the Password cell empty to auto-generate; set Email Notification to
nowhen creating accounts that use an email; set Change Password Upon Initial Login toyesto enforce a change at first login.
Where to find it
-
Create: Configuration → Organization → User → Add user
-
Reset: User row → Reset Password
-
Import: Configuration → Organization ** User → Import → upload the updated .xlsx/.csv template
Notes
-
Weak/invalid manual passwords are blocked with an inline error.
-
Auto-generated passwords always comply with the policy.
-
All actions respect existing role/permission controls for user management.
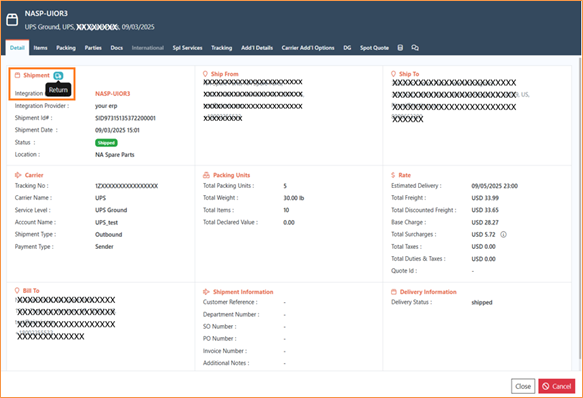
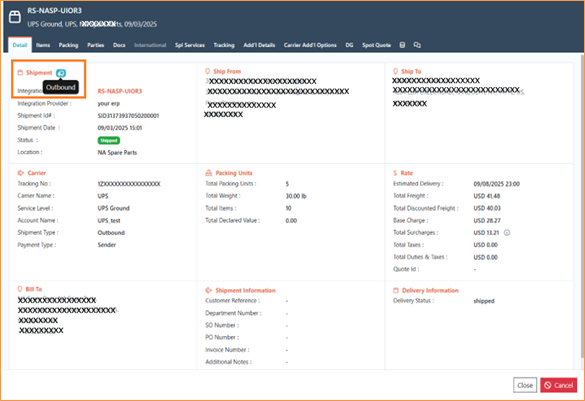
16. Outbound and Return Shipment Enhancement
We’ve separated Outbound and Return shipment processing so they can use different carriers and payment details. This gives you flexibility to rate, ship, and bill the return independently from the outbound.
Previous Behavior
Outbound and Return shipments were always processed with the same carrier. The carrier selected in the Shipment Information section was automatically mapped to the Return Shipment section. Enhancement:
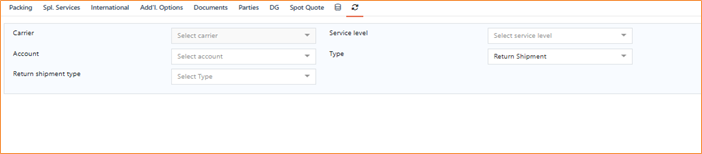
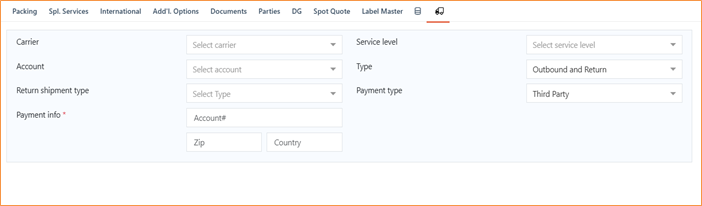
New Behavior
With this update, the Return Shipment Details section now allows you to select a different carrier and payment details. This means outbound and return shipments can be processed independently, even with different carriers.
After processing, you will see two separate shipment records: one for outbound and one for return. Example: Outbound (Delivery No: 09032025), Return (Delivery No: RS-09032025).
- Ship View: Outbound and return appear as separate rows with distinct icons to identify each leg.
- History: Outbound and return are also icon-tagged so you can quickly distinguish them from standard shipments.
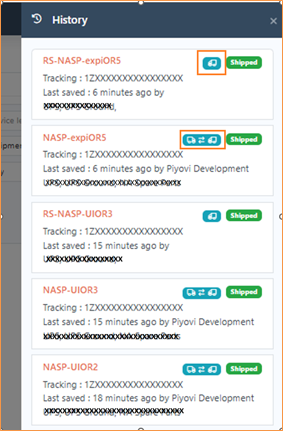
- Navigation: Use the truck icon to jump between the Outbound and its Return shipment.